Before heading towards the main topic, it is important to have reasonable knowledge regarding these terms and an understanding of what role they play in Spring Boot REST APIs. So, let's understand what is @RequestParam annotation, what they do, how to use them with examples as well @RequestBody annotation with examples.
@RequestParam Annotation in Spring MVC
The @RequestParam annotation in the Spring application allows us to read values from request parameters. Input data can be provided in the form of a query, form data, etc. It uses to bind it automatically to the method parameters provided in the method body. In the next paragraph, we will understand how to capture the requested data using @RequestParam annotation.This annotation can have the following optional parameters as mentioned:
• defaultValue – when the request parameter is absent or has no value, it is utilized as a fallback
• name - use to bind parameter with the request
• required – show whether it is mandatory or not
• value – name alias
Here is an example of Spring Boot web application that makes use of @RequestParam annotation. In this application, I have included two text inputs as username and password in our HTML form. These two tags produce request parameters, which are later read by @RequestParam in the controller.
1) Create a new maven project

2) Adding dependencies to your pom.xml file
Next step is to add dependencies in your pom.xml which will make Maven download JAR files automatically from Maven central or Nexus repository configured in your settings.xml file.
<?xml version="1.0" encoding="UTF-8"?>
<project xmlns="http://maven.apache.org/POM/4.0.0" xmlns:xsi="http://www.w3.org/2001/XMLSchema-instance"
xsi:schemaLocation="http://maven.apache.org/POM/4.0.0 https://maven.apache.org/xsd/maven-4.0.0.xsd">
<modelVersion>4.0.0</modelVersion>
<parent>
<groupId>org.springframework.boot</groupId>
<artifactId>spring-boot-starter-parent</artifactId>
<version>3.0.1</version>
<relativePath/> <!-- lookup parent from repository -->
</parent>
<groupId>com.usama</groupId>
<artifactId>ipl-dashboard</artifactId>
<version>0.0.1-SNAPSHOT</version>
<name>IPL Dashboard</name>
<description>App tries to replicate how an IPL Dashboard works</description>
<properties>
<java.version>17</java.version>
</properties>
<dependencies>
<dependency>
<groupId>org.springframework.boot</groupId>
<artifactId>spring-boot-starter-web</artifactId>
</dependency>
<dependency>
<groupId>org.springframework.boot</groupId>
<artifactId>spring-boot-starter-thymeleaf</artifactId>
</dependency>
<dependency>
<groupId>org.springframework.boot</groupId>
<artifactId>spring-boot-devtools</artifactId>
<scope>runtime</scope>
<optional>true</optional>
</dependency>
<dependency>
<groupId>org.springframework.boot</groupId>
<artifactId>spring-boot-starter-test</artifactId>
<scope>test</scope>
</dependency>
</dependencies>
<build>
<plugins>
<plugin>
<groupId>org.springframework.boot</groupId>
<artifactId>spring-boot-maven-plugin</artifactId>
</plugin>
</plugins>
</build>
</project>
3) Create Controller class
Now, it's time to code Java classes, starting with Controller
import org.springframework.stereotype.Controller;

import org.springframework.ui.Model;

import org.springframework.web.bind.annotation.RequestMapping;

import org.springframework.web.bind.annotation.RequestParam;

import org.springframework.web.bind.annotation.ResponseBody;


@Controller

@RequestMapping("/api/v1")

public class LoginController {


    @RequestMapping(path = "/login-page")

    public String getLoginPage(){

        return "login";

    }

    @RequestMapping("/login-processing")

    public String loginProcessing(
           @RequestParam(required = true, name = "username") String username,
           @RequestParam(required = true, name = "user-password") String password,
           Model model){

        if(username.equals("username") && password.equals("password")) {

            model.addAttribute("username", username);

            return "home";

        }

        else {

            model.addAttribute("error_message",

 "Oops! entered username or password is incorrect");

            return "error";

        }

    }

}
Once a user submits a form along with a username and password. The /login-processing endpoint will then captures the data from the query string and do a simple check to redirect between the error page and the home page.
/api/v1/login-processing?username=username&user-password=password&submit=Submit
@RequestParam(required = true, name = "username")String username

@RequestParam(required = true, name = "user-password") String password
Using @RequestParam annotation, one can see we are binding the request parameter with the variable inside the method body
if(username.equals("username") && password.equals("password"))  {
  model.addAttribute("username", username);
            return "home";

} else {
   model.addAttribute("error_message", "Oops! entered username or password is incorrect");
   return "error";

 }
Here we are checking if the username and password fields contain the term ‘username’ and ‘password’ respectively, redirecting the user to the home page and otherwise navigating to an error page.
4.Application entry point
import org.springframework.boot.SpringApplication;

import org.springframework.boot.autoconfigure.SpringBootApplication;

import javax.persistence.EntityManager;


@SpringBootApplication

public class IplDashboardApplication {

   public static void main(String[] args) {

      SpringApplication.run(IplDashboardApplication.class, args);


   }

}
5. Create view pages
• Login page
<!DOCTYPE html>

<html>

<head>

   <meta charset="utf-8">

   <meta name="viewport" content="width=device-width, initial-scale=1">

   <title>Login Page</title>

</head>

<body>

   <div class="login-header">

      <h2>Welcome to the Login Page</h2>

   </div>

   <div class="login-body">

      <form method="GET" action="login-processing">

         <p>Enter your username </p>

            <input type="text" name="username"

 placeholder="Enter your username">

         <p>Enter your password</p>

         <input type="password" name="user-password"

 placeholder="Enter your password">

         <br>

         <br>

         <input type="submit" name="submit">

      </form>

   </div>

</body>

</html>
• Home Page
<!DOCTYPE html>
<html xmlns:th="http://www.thymeleaf.org">
<head>
<meta charset="utf-8">
<meta name="viewport" content="width=device-width, initial-scale=1">
<title>Home Page</title>
</head>
<body>
<div class="home-header">
<h2 th:text="|Hi, ${username} Welcome to the Home Page|">Default</h2>
</div>
</body>
</html>
• Error Page
<!DOCTYPE html>
<html xmlns:th="http://www.thymeleaf.org">
<head>
<meta charset="utf-8">
<meta name="viewport" content="width=device-width, initial-scale=1">
<title>Error Page</title>
</head>
<body>
<div class="error-header">
<h2 th:text="${error_message}">Oops! something went wrong</h2>
</div>
<div style="text-align: center; margin: 0px auto; width: 500px">
<p>Navigate to Login page?
<a href="http://localhost:8080/api/v1/login-page">
Login Here</a></p>
</div>
</body>
</html>
What is @RequestBody Annotation in Spring MVC
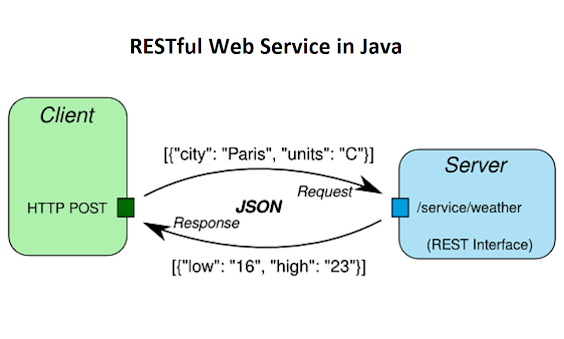
The request body is known to us as data sent by a client to the server or API. The data which client sent to the server with a POST request may look like
{

    "username": "some-user",

    "email": "some-email",

    "address": "xyz-address"

}
In Spring, the HttpRequest body is automatically deserialized into a Java object thanks to the @RequestBody annotation, which translates the HttpRequest body to a transfer or domain object.
According to Spring’s documentation, @RequestBody annotation is bounded to the web request body. Which then pass through HttpMessageConverter to deserialize into Java objects depending on the request content type (i.e. JSON or XML).
Let’s take a look at Spring controller method.
// Sending a simple Email

@PostMapping("/sendMail")

public String sendMail(@RequestBody EmailDetails details){

    String status = emailService.sendSimpleMail(details);

    return status;

}
public class EmailDetails {

    private String recipient;

    private String msgBody;

    private String subject;

    private String attachment;


}
As you can see endpoint /sendMail accepts a request body from a client and parse it to the mentioned EmailDetails type. Spring immediately deserializes the JSON into it. By default, the @RequestBody annotation requires that the type we annotate match the JSON that was transmitted from our client side to the controller.
1) -> Client sends data (JSON/XML)
2) -> Intercept by HttpMessageConverter for deserialization
3) -> Hold by a model object (a.k.a User defined object)
Difference Between @RequestBody and @RequestParam annotation in Spring
After understanding the two annotations. Now it’s time to take a look at the difference between them. Below is the list of differences
@RequestParam Annotation
@RequestParam maps a GET or POST request parameter to the method’s argument.
http://localhost:8080/getMatchInfo?team=Indiapublic String getMatchInfo(@RequestParam(value = "team")
String team){
}@RequestBody
@RequestBody on the other hand maps the whole client request to a model class. We use model class’s getter and setters to use its properties.
http://localhost:8080/postVehicle

{

   "vehicle": "VehicleName",

   "yearManufacture" : "2008",

   "registrationNumber": "1909",

   . . .

}
public String postVehicleInfo(@RequestBody Vehicle vehicle)

    {

        vehicle.getColor();

        vehicle.getYearManufacture();

    }


public class Vehicle {


    private String name;

    private String color;

   // additional fields


    public String getColor() {

        return color;

    }


    public void setColor(String color) {

        this.color = color;

    }


    public String getVehicleName() {

        return name;

    }


    public void setVehicleName(String name) {

        this.name = name;

    }

}
That's all about difference between @RequestParam and @RequestBody annotation in Java. In this article, we learned the difference between the @RequestParam and @ReqeustBody annotation in Spring MVC. We started our discussion by defining each annotation along with a suitable example in the context of the Spring Boot application. Hope the article helps you to distinguish between the two annotations and how to use them in your Spring Boot application.
- Difference between @Contorller and @Repository in Spring
- 10 Things Java Developer Should Learn
- How to use @RequestBody and @ResponseBody in Spring
- 5 Free Courses to Learn Spring Framework
- Top 5 Courses to Learn and Master Spring Cloud
- Top 15 Spring Boot Interview Questions for Java Developers
- 5 Spring Books Experienced Java Developer Should Read
- 5 Courses to Learn Spring Security in depth
- 10 Tips to become a better Java Developer
- How to test Spring Boot application in Java
- Top 5 Frameworks Java Developer Should Know
- Top 10 Courses to learn Microservices in Java with Spring Boot
- Top 5 Courses to learn Spring Cloud and Microservices
- 10 Books Java Developers Should Read
- Top 5 Books and Courses to learn RESTful Web Services in Java
- 10 Advanced Spring Boot Courses for Experienced Java Developers
- 10 Spring Boot Annotations Java Developers should know
Thanks for reading this article so far. If you like my explanation of difference between @RequestParam and @RequestBody annotation in Spring MVC then please share them with your friends and colleagues. If you have any questions or feedback, then please drop a note.
No comments:
Post a Comment
Feel free to comment, ask questions if you have any doubt.