Hello guys, if you are wondering how to test your Spring Boot application then you have come to the right place. Earlier, I have shared popular Spring Boot Testing Interview Questions and Spring Security Interview Questions and In this article, I will show you examples to test your Spring Boot application using @SpringBootTest annotation, which allows you to write Integration tests. When I talk about spring boot integration testing, I am talking about launching an application in ApplicationContext and performing tests. For integration testing, Spring Framework has a specific test module. It's referred to as a spring test. If we're going to utilize spring-boot, we'll need to use spring-boot-starter-test, which uses spring-test and other dependencies inside.
We'll look at how to perform integration tests for a Spring Boot application in this post.
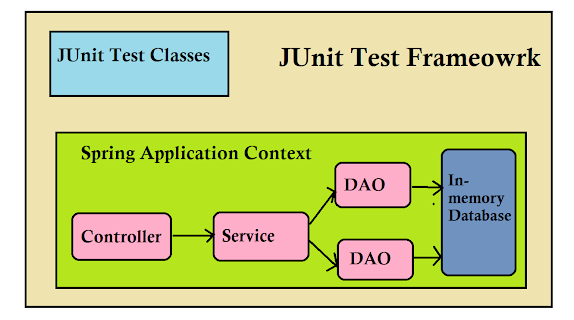
First of all, let's understand what integration testing is and what to test as part of integration testing in Spring.
What to test in Integration Testing?
- An integration test is designed to see if different modules are properly bound and function as intended.
- Integration
tests should not use actual production requirements (e.g.
database/network), but they should be able to imitate certain behaviors.
- The application should run in ApplicationContext, and tests should be done there as well.
- The
@SpringBootTest annotation in Spring Boot launches the embedded server,
establishes a web environment, and then allows @Test methods to do
integration testing. For this, use the web environment property.
- In addition, it produces the ApplicationContext that we need in our tests.
- When
simulating a database, the h2 in-memory DB is an excellent choice.
Though it is not required, we may imitate database interactions using
Mockito.
- It is advised to use the @TestConfiguration annotation to test particular setups.
What is @SpringBootTest annotation?
- Mock: (This is the default option)Creates a mock web environment by loading a web ApplicationContext.
- RANDOM
PORT: Provides a genuine web environment by loading a
WebServerApplicationContext. The embedded server is started and listens
on a port that is chosen at random. For the integration test, this is
the one to utilize.
- DEFINED PORT: Provides a genuine web environment by loading a WebServerApplicationContext.
- NONE: Uses SpringApplication to load an ApplicationContext, but does not offer a web environment.
3. Setting up our Spring Boot Application for Testing
Controller:
@RestController
public class CricketerController {
    @Autowired
    private CricketerService cricketerService;

    @PostMapping("/cricketers")
    public ResponseEntity<Void> createCricketer() {
        List<Cricketer> cricketers =  cricketerService.createCricketer();

        URI location = ServletUriComponentsBuilder.fromCurrentRequest().path(
            "/{id}").buildAndExpand(cricketer.get(0).getId()).toUri();

        return ResponseEntity.created(location).build();
    }

    @GetMapping("/cricketers/{cricketerId}")
    public Cricketer retrieveCricketer(@PathVariable Integer cricketerId) {
        return cricketerService.retrieveCricketer(cricketerId);

    }

}
Service:
@Component
public class CricketerService {

    @Autowired
    private CricketerRepository repository;


    public List<Cricketer> createCricketer() {
        List<Cricketer> cricketers = new ArrayList<Cricketer>();
        List<Cricketer> savedCricketers = new ArrayList<Cricketer>();

        cricketers.add(new Cricketer("ABD", "11"));
        cricketers.add(new Cricketer("Virat King Kohli", "7"));
        cricketers.add(new Cricketer("Rohit Sharma", "10"));
        Iterable<Cricketer> itrCricketers=repository.saveAll(cricketers);
        itrCricketers.forEach(savedCricketers::add);
        return savedCricketers;
    }
    public Cricketer retrieveCricketer(Integer cricketerId) {
        return repository.findById(cricketerId).orElse(new Cricketer());

    }

}
Repository:
@Repository
public interface CricketerRepository extends CrudRepository<Cricketer, Integer>{

}

Out Test Class:
@RunWith(SpringRunner.class)
@SpringBootTest(webEnvironment = SpringBootTest.WebEnvironment.RANDOM_PORT)
public class CricketerControllerTests {

    @LocalServerPort
    private int port;

    TestRestTemplate restTemplate = new TestRestTemplate();

    HttpHeaders headers = new HttpHeaders();
    @Test
    public void testCreateCricketer() throws Exception {
        HttpEntity<String> entity = new HttpEntity<String>(null, headers);

        ResponseEntity<String> response = restTemplate.exchange(
        createURLWithPort("/cricketers"), HttpMethod.POST, entity, String.class);

        String actual = response.getHeaders().get(HttpHeaders.LOCATION).get(0);

        assertTrue(actual.contains("/cricketers"));
    }

    @Test
    public void testRetrieveCricketer() throws Exception {
        HttpEntity<String> entity = new HttpEntity<String>(null, headers);

        ResponseEntity<String> response = restTemplate.exchange(
        createURLWithPort("/cricketers/1"), HttpMethod.GET, entity, String.class);

        String expected = "{\"id\":1,\"name\":\"ABD\",\"description\":\"11\"}";

        JSONAssert.assertEquals(expected, response.getBody(), false);
    }

    private String createURLWithPort(String uri) {
     return "http://localhost:" + port + uri;
    }

}
Conclusion
- 5 Spring Boot Annotations for full-stack Java developers (tutorial)
- 20 Spring Boot Interview Questions for Java Programmers (questions)
- 5 courses to learn Spring Boot and Spring Cloud ( courses)
- 10 Spring MVC annotations Java developers should learn (annotations)
- 10 Tips to become a better Java developer (tips)
- 5 Courses to learn Spring Cloud and Microservices (courses)
- 3 ways to change Tomcat port in Spring Boot (tutorial)
- 5 Spring Boot Features Every Java Developer Should Know (features)
- 5 Course to Master Spring Boot online (courses)
- 10 Courses to learn Spring Security with OAuth 2 (courses)
- 10 Things Java Developer should learn (goals)
- Top 5 Courses to learn Microservices in Java? (courses)
- 10 Tools Java Developers use in their day-to-day life (tools)
- 10 Advanced Spring Boot Courses for Java Programmers (courses)
- Top 5 Books and Courses to learn RESTful Web Service (books)
- 3 Best Practices Java Programmers can learn from Spring (best practices)
No comments:
Post a Comment
Feel free to comment, ask questions if you have any doubt.